Previous Topic "Content Setup Form (Report Format)"
Alerts and messages can be setup to send based upon a preset list of definitions. The alerts types available under the Schedule tab are also listed in the RM BackOffice under Setup > General > Alerts. It is in this back office form where specific computed alerts can be disabled.
You may also set a scheduled to send reports configured in the RM Report Module. You have the option of sending on a daily or monthly basis at a pre-configured time. This function is excellent for off site management.

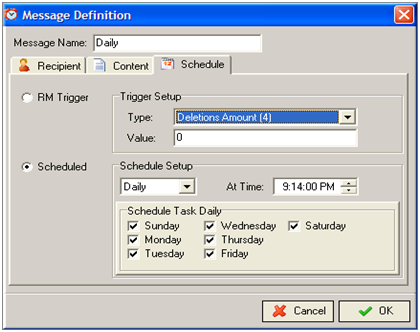
RM Trigger-The Trigger Setup section under the Schedule tab has two fields: Trigger type and Value. Click on the “type” drop down menu to select a preconfigured trigger type. The trigger types are as follows:
# Voided Checks- You can set a trigger based the number of voided checks produced at the POS system using the “Void” method of payment.
Voided Check Amounts- trigger an alert based on dollar amount of “Voids” using the “Void” method of payment
# of Deletions- triggers alert based on the number of deletions on a guest check using the “delete” function at the POS or WO unit.
Deletion Amounts- this option will trigger an alert based on dollar amount of deletions.
Open/Not sent- use this option to trigger an alert based on the time where a table remains inactive after being opened.
Printed/Not Settled- you can create a trigger based upon the time difference when a table remains inactive after being printed.
VIP Customer- You can create a trigger alerting you when a customer comes in and spends a large amount of money. An alert will be generated if a check is open for a customer already present in the "Customer Database". The Customer Loyalty program is required.
Customer Spend- use this trigger to send an alert based upon dollars spent on an order. This field calculates per customer. Example: field is set to trigger at $40. A table has 4 customers; the alert will be triggered when $160 is spent.
Payroll Hours- You can set a trigger based upon hours worked in a week based on parameters setup in Payroll Options (RM BackOffice > Activities> Payroll Options). This trigger is use to report overtime alerts. The Payroll Hours report calculates hours for the current payroll period, as determined by Start and End date fields in Payroll options (pay_start and pay_end field columns found in Config.dbf in the rmwin directory). See the example below when a fourteen day pay period is used.
Daily Hours- You can set a trigger based upon hours worked for a current login date. You can use this trigger for overtime alerts.
$ Labor Costs- Set a trigger based on labor dollars for an hour time period. Hour adjustments must be made in the RM BackOffice > Setup >Alerts > $ Labor Costs.
Labor Cost % Sales- set a trigger based on labor dollars divided by sales. This is an hourly setting that must be configured in the RM BackOffice > Setup > Alerts > Labor Cost % Sales.
Weekly Hours- Use this field to set a trigger based upon hours worked in a week. This trigger is use to report overtime alerts Weekly hours, however, always report from the current day back to 12:01a.m. of the same day of the week as pay_start field column found in Config.dbf in the rmwin directory and configured in RM Backoffice > Activities> Payroll Options .
Please see Appendix 1 Hourly Trigger Examples section of this document for examples of expected behavior when Daily Hours and Weekly Hours Trigger are used.
Value Field- The number entered in this field will be used to trigger the criteria set in the trigger type field. An example would be if your entered a “7” in the value field with using “Daily Hours’ the system will send an alert for any employee logged in who crosses the 7 hour threshold.
It should be noted that the field setting in the Alert Setup in RM BackOffice take precedence over the value field settings in RMMsgdef. It is recommended you use the Alert Setup form to define values.
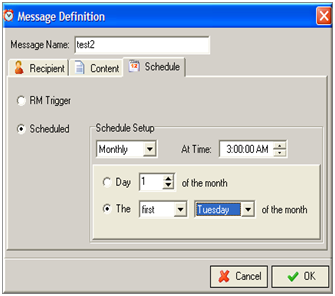
Schedule- The schedule function is used primarily in conjunction with send reports from the RM Report Module. Using this trigger mechanism you can schedule reports “Daily” or “Monthly” using the Schedule Setup drop down menu. The Schedule Setup form will change depending which schedule type you select (daily or monthly). If you choose “Daily”, you can continue to filter the settings by day of week and time of day. If you choose monthly, you can filter the report to run by day of month or a specific day within the month (i.e. 1st Tuesday of the month- see screen shot below).

Next Topic "Alerts RM BackOffice"